May 2020 – Xero have updated their integration processes. Integrations prior to this time will continue to work (for the time being), but the new process should be used for new connections.
The new process makes it much easier to connect your Xero account to Quoox. Learn how
Xero is an online accountancy solution for small-to-medium sized business. It is extremely user friendly, has wide adoption and integration with banks, and is integrated with Quoox.
By linking your Xero account with Quoox, we are able to record financial transactions in your accounting system in real-time. This saves you both time and money, as well as providing you a solid overview of your financial position at any point.
To integrate your Quoox system with Xero, follow these steps.
Step 1
Setup an account with Xero at https://xero.com/
Choose the plan that suits you. The system is typically available for you to use within a few minutes.
Note: Before you integrate your Xero system with Quoox, you should complete all of the Xero setup steps first, and ensure you have Xero configured to your liking/needs.
Step 2
Go to https://developer.xero.com/ and log in with your primary Xero account login.
Select My Apps from the main menu, and then click the New App button.
Step 3
Within Quoox, access the Integrations Configuration by selecting Integrations from the Settings heading of the main menu.
Navigate to find the Xero section of the integration settings.
Click the Download X509 Certificate button. Save the file safely on your computer. It must be kept secure, and you should not share this file with any other people.
Step 4
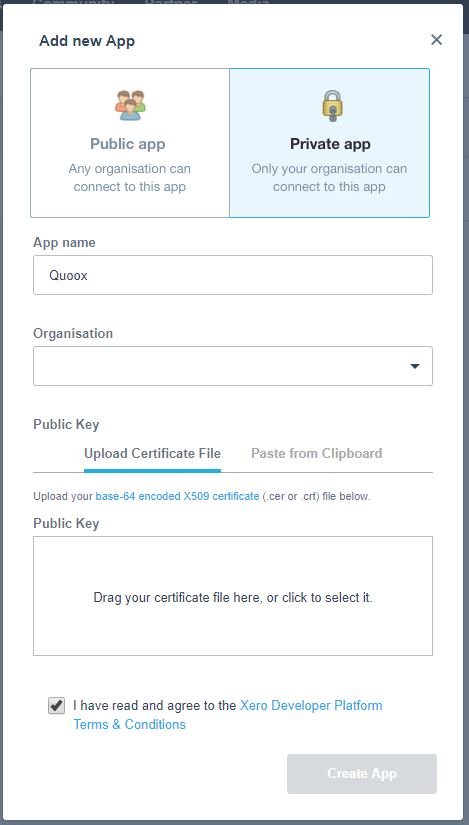
Returning to the Xero Developer Portal, complete the Add New App popup screen:
- Select Private app
- For the App name enter “Quoox”
- Select your Xero organisation from the Organisation drop-down
- For public key select Upload Certificate File
- Drag-and-drop the .cer file you downloaded in step 3 into the Drop your certificate file here box.
Alternatively, click in the box to open the “find dialog” to locate the certificate file on your computer - Click the I have read and agree… box
Click Create App, to setup the first step of integration between Xero and Quoox.
Step 5
Click on the name of the app you have just created (“Quoox”) within the Xero app listing.
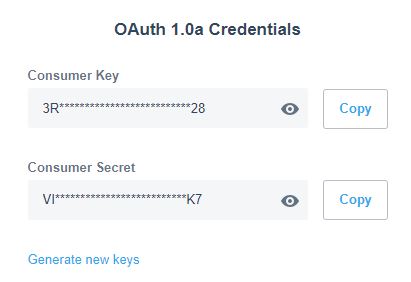
Navigate to the OAuth 1.0a Credentials section.
Copy the Consumer Key into the Consumer Key field in the Quoox integrations page.
Copy the Consumer Secret into the Consumer Secret field in the Quoox integrations page.
Step 6
Click Save in Quoox. The Xero integration settings will be verified and a test connection performed.
Step 7
Once saved, Quoox will display a number of additional configuration options in the Xero section. You can typically leave these as the defaults, but you may wish to tailor how invoices are allocated within your Xero system. You should ensure that the account and tax coding is set correctly for each item.
IMPORTANT: In compliance with tax accounting rules, Quoox will create transaction records in Xero corresponding to your transactions in Quoox. These will comprise both invoices and credit notes (for refunds). Please note that the invoice will be created at the value charged, and that you will need a separate transaction to fully reconcile the monies you actually receive from Stripe and GoCardless.
We have provided some guidance regarding reconciling your Stripe payments.


