Quoox aims to ease your shift and rota management woes with the Shift Manager.
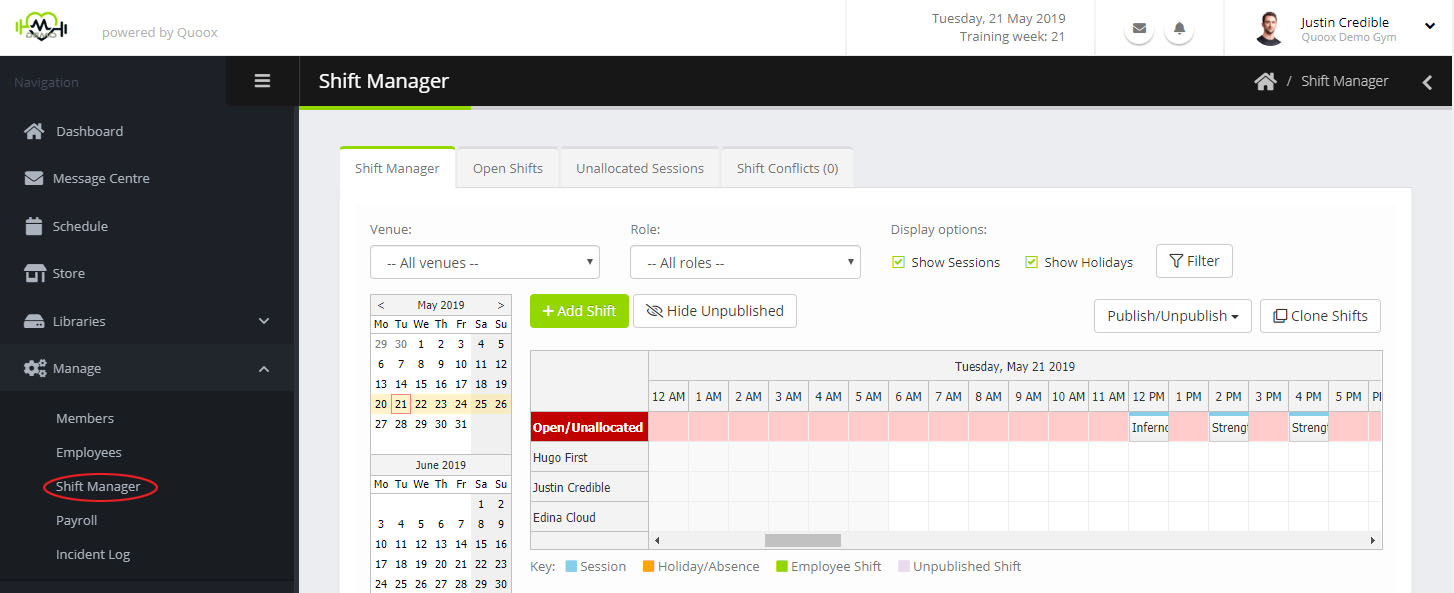
Select the Shift Manager option from the Manage heading of the main menu.
In the Shift Manager window, sessions and employee shifts are displayed side-by-side for easy visual correlation.
You can use the Venue, and Role drop-downs to refine the employees and sessions displayed in the schedule view.
By checking/un-checking Show Sessions and Show Holidays you can also opt whether to include sessions and holidays in the schedule view at all. Click the Filter button to apply your filter criteria.
Open/unallocated shifts, and sessions that are yet to be assigned a trainer are displayed in the Open/Unallocated row. This is essentially your problem row, and where you likely need to focus most of your attention. This why it is highlighted in red.
Adding a new shift
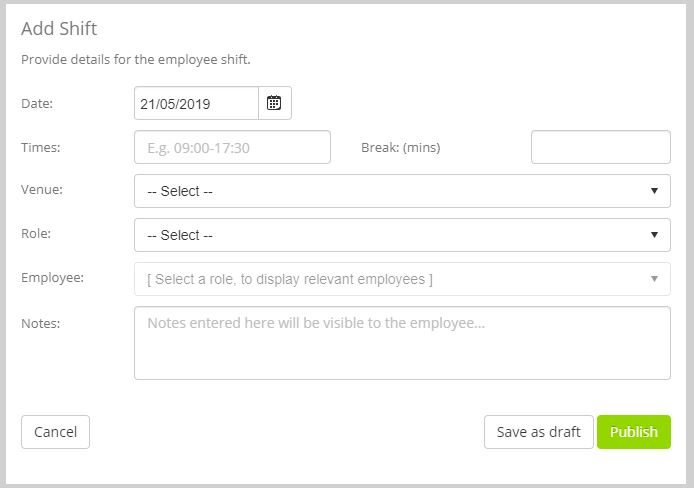
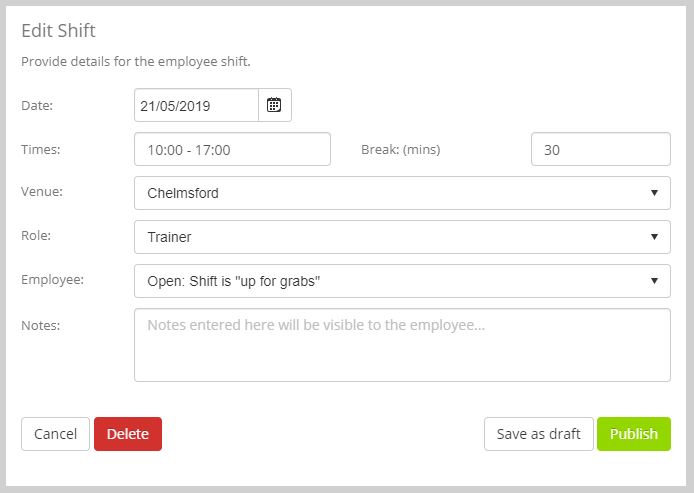
To add a new shift, either click anywhere in the schedule view or click the Add Shift button. This will open the add/edit shift dialog:
For each shift, provide:
- Date – You can select the desired date by clicking on the icon.
- Times – The start and end time for the shift. Most time formats a supported (E.g. 9:00 – 17:30)
- Break – Optionally, enter a time in minutes for the duration of the break included in this shift
- Venue – Select the venue for which the shift exists.
- Role – Select the role type for the shift. Roles can be setup in Lists and Groups.
- Employee – Once you have selected a venue and role, suitable employees will be displayed.
Select an employee if you wish to assign one, or leave this blank if this is yet to determined. - Notes – Add any optional notes regarding this shift. These notes will be visible to the employee.
Clicking Save As Draft will save the shift as “unpublished”. Any assigned employees will not be notified.
Clicking Publish will save the shift as “published”. Any assigned employees will be notified, and it will appear in the shift listing in the Quoox mobile app.
Allocating a session to a trainer/staff member
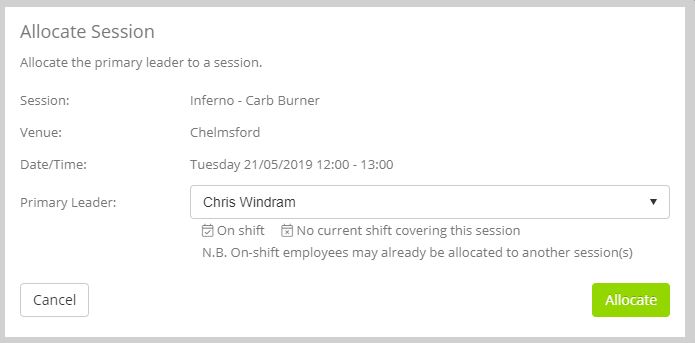
You can allocate a given session to a particular employee/staff member by clicking on the session. This will open the assignment screen.
Eligible staff members will be displayed, along with an indication as to whether they have a scheduled shift at the given time.
Select the employee you wish to allocate as the primary leader for the session and click the Allocate button.
The session will be assigned to the staff member, and moved accordingly.
IMPORTANT: You should ensure that the member has a corresponding shift to cover the session, and create one as necessary.
Cloning shifts for repeating shift patterns
Cloning shifts is an easy way to create a repeating pattern of shifts, rather than you needing to repeated add shifts week-on-week.
As most centres operate on a pattern, this greatly reduces the time overheads, and allows you to concentrate on the exceptions, rather than the norm.
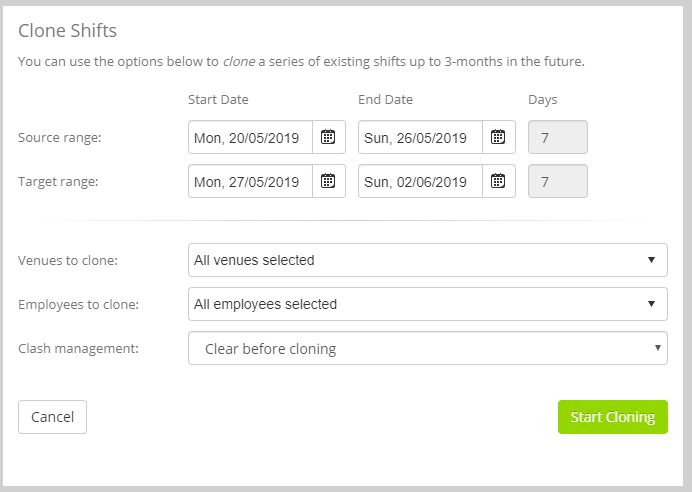
To clone shifts, click the Clone Shifts button. The cloning dialog will open.
Enter:
- Source Range – The date range that you wish to use as the template to copy.
E.g. If you have a repeating 2-week shift pattern, setup the first 2-weeks, and select those 2-weeks as being the source - Target Range – The date range across which you wish to copy the source shifts.
This target range can be any multiple of the source range, but must not overlap the source range (don’t cross the streams!) - Venues to Clone – Select the venues that you wish to clone. By default this is all venues.
- Employees to Clone – Select the employees to clone. By default this is all employees.
- Clash management – Choose how you wish shift conflicts to be dealt with
- Overwrite clashing shifts – Shifts that conflict will be deleted and replaced
- Move clashes to open shifts – Copied shifts that clash with existing shifts will be moved to unassigned/open
- Don’t copy shifts that clash – Shifts that overlap existing shifts will not be copied
Viewing open or unallocated shifts
You can view open shifts (unallocated shifts) by clicking on the Unallocated Shifts tab in the Shift Manager.
A list of all open or unallocated shifts for the forthcoming 3-months will be displayed. Shifts that have already started, or that have passed, are not displayed.
To allocate a shift, click on the Allocate Shift button. The shift allocation screen, as detailed above, will be displayed.
Unallocated Sessions
A list of unallocated sessions (those scheduled sessions without a primary lead member assigned) can be viewed on the Unallocated Sessions tab of the Shift Manager.
The date/time, venue and session can be seen at a glance. Also displayed is the number of currently booked members.
Clicking the Allocate Session button will open the session assignment dialog (as before), and allow you to assign an employee to the session.
IMPORTANT: When assigning an employee, you should also verify that they have a corresponding shift.
Shift Conflicts
From time-to-time you may accidentally assign the same employee to two different (overlapping) shifts.
By selecting the Shift Conflicts tab in the Shift Manager, you can see at a glance any conflicting shifts. A number indicator is also displayed against the tab, showing the number of conflicting shifts.
You can click the View/Edit Shift button against a given conflict to open the shift dialog (as above), and amend the allocation accordingly.
