The Membership Tab contains all of the information you need regarding the member’s current memberships; credit allocation; and auto-bookings.
From March 2020, Quoox supported layered memberships, whereby members may have multiple simultaneous memberships.
Clicking Add Membership will enable you to add a new membership.
Clicking Add AutoBook will enable you to add a new automatic session booking.
Clicking Add Credits will enable you to add ad-hoc credits to the member.
Add a new Membership
Adding a new membership to a member comprises several steps. The process is triggered by clicking the Add Membership button.
Step 1
Firstly, select the membership type you wish to assign. Many centres will have only one membership type.
The list of available payment plans for the chosen membership will be displayed. Select the desired payment plan.
Step 2
The configuration of the membership will be displayed. You may optionally tailor some of the details here, as you wish. For example, you may not wish to issue grace credits – thus ensuring credits only become available following a successful payment.
Step 3
Select a payment method for the membership. If the member already has payment cards stored, you may use one of these cards. Alternatively, you may add a new card.
Offline payment methods are also supported, although you will need to manually verify that payment is received each payment period.
Note: Because it takes circa 7-days to setup and charge a Direct Debit instruction, payment by DD is not offered for the first payment. A Direct Debit instruction may be added at any time on the Activity & Transactions Tab and, once active, would automatically be used for subsequent payments.
Step 4
Confirmation of the charges, timings and fees is displayed. Depending on your membership configuration, it is possible that a pro-rata payment will be required for the membership. This is displayed, along with the corresponding pro-rata percentage.
Example: If you have selected a payment plan that takes payment on the 1st of each month, and you’re starting a membership immediately on 22nd month, a pro-rata payment of 31.39% is due, as that is the remaining period in the month.
Step 5
Confirmation of the payment and membership creation is displayed. Where applicable, credits will be issued immediately. In a pro-rata situation, you may wish to decide if the number of credits allocated for the first period needs altering (likely reducing).
Allocating ad-hoc Credits to a Member
If a member has a membership, you should only need to add credits if they need a top-up, or if they wish to attend a type of session/class not covered by the credits issued under their current membership.
Allocating credits to a member comprises several steps, triggered by clicking the Add Credits button against a member.
Step 1
Select the Credit Pack type that you wish to allocate. Alternatively, select — Ad-hoc Credit Allocation — to create an ad-hoc allocation.
Step 2
Setup and/or configure the credit pack details. If you are allocating a pre-configured pack, you may edit the pack details.
Step 3
Select the chosen payment method for the credit pack. If the member has existing cards configured, these may be used, or a new card added.
Step 4
The pre-allocation screen will confirm the number of credits to be allocated, their cost, and their basic configuration.
Step 5
The final screen confirms that payment has been successfully received, and that the credits have been allocated.
Editing a membership
Once a membership has commenced, a few elements of the membership remain editable. To edit a given membership, click the corresponding Edit button.
The details you can edit comprise:
- Cost per period – The cost per membership period, including taxes, in your local currency
- Start date – If the membership is set to start on a given date and has not yet started, you may amend the start date
- Auto renew – Whether the membership should auto-renew
- Allocate grace credits – Whether the member should be allocated grace credits to allow interruption-free forward booking
Pausing a membership
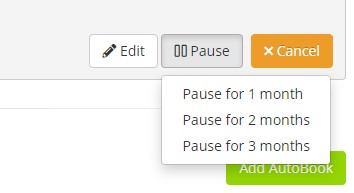
You may pause a membership by clicking on the Pause button.
Options are provided for pausing for 1 month; 2 months; or 3 months. Select and confirm your desired pause duration.
A membership pause effectively adds the selected period of time to the membership next payment date, and the credit next issuance date. Therefore the actual pause period will slightly dependant to where the member is in the payment cycle.
It is possible to pause a membership multiple times. It is generally recommended to implement shorter pauses, as re-instating a membership early (having paused it) would require cancellation and re-creation.
Viewing Credits and Credit History
The credits available to a member, and previously used by a member, are displayed in the Membership & Credits tab.
For each group of credits, the number of credits originally allocated is displayed, along with the number available. The credit configuration and validity is shown for each grouping, along with any sessions/classes against which a credit has been spent.
Editing Credits
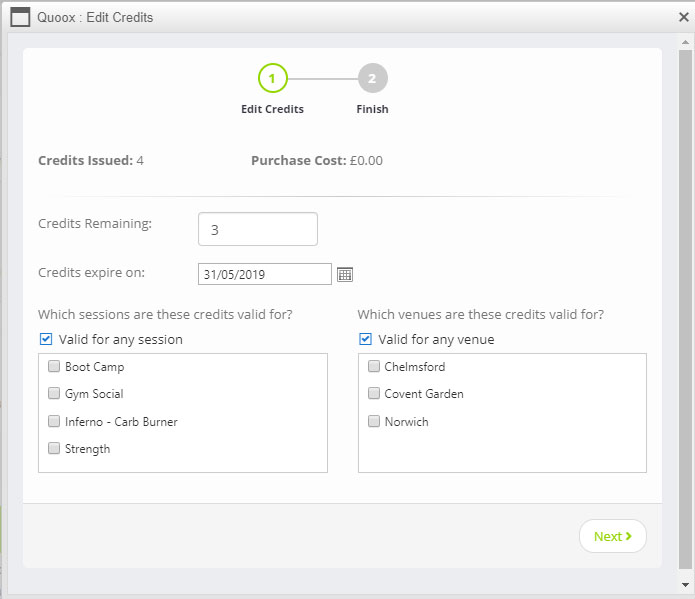
If you need to edit a credit allocation block, click on the Edit Credit button. The edit credit screen will be displayed.
When editing credits, the details that can be altered are:
- The remaining number of credits (up or down)
- The expiry date for the credits
- The sessions against which the credits are valid
- The venues against which the credits are valid
Changes made to credits are logged, and an audit trail is retained.
IMPORTANT NOTE: Editing the credit allocation in this manner does not take payment from a member, nor refund it. Any related funding matters must be decided and address independently to this process, and inline with your business processes.


