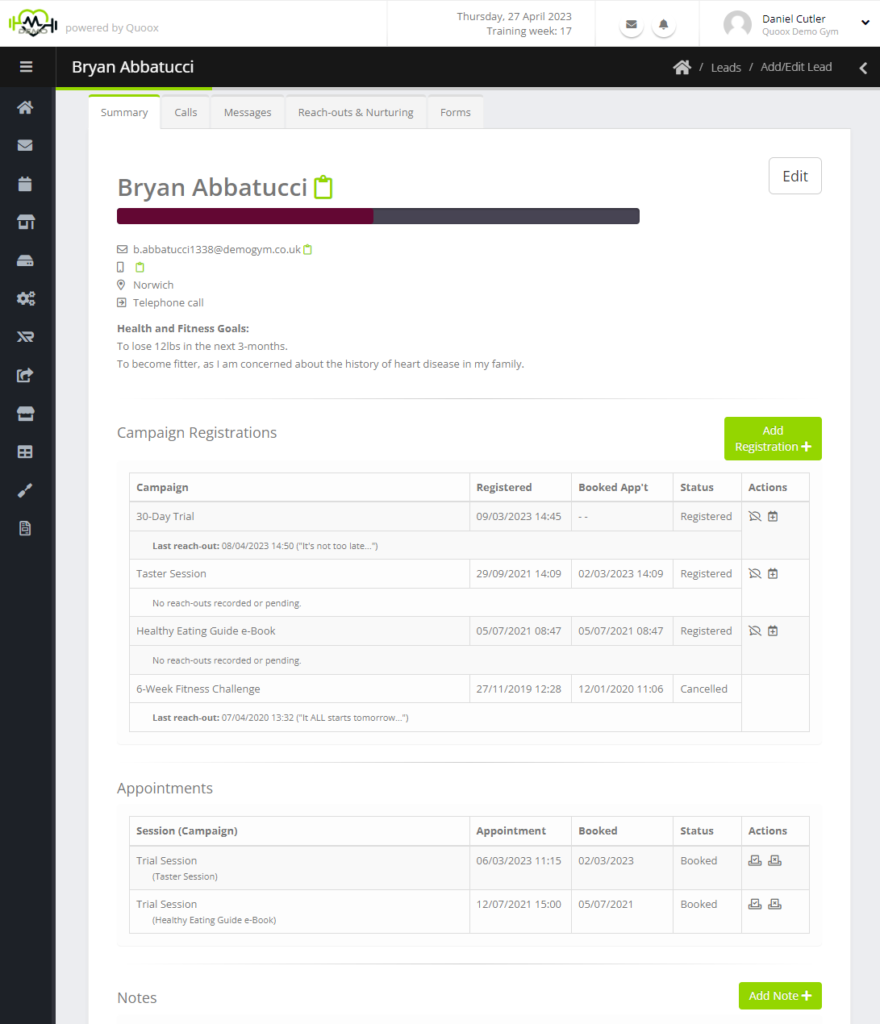
The Summary tab of the lead record is where most of the lead information can be seen at-a-glance.

The lead’s contact details are provided, along with an Edit button which provides a mechanism to update them.
Campaign Registrations
The campaigns for which a lead is registered are listed.
For each campaign, the information provided comprises:
- Campaign – the campaign for which the lead registered
- Registered – the date/time upon which they registered
- Book App’t – if they have booked an appointment for this campaign, the date/time for which it is/was scheduled
- Status – the status of the lead’s campaign registration
- Last reach-out – the last reach-out sent to the lead
- Next reach-out – the next reach-out scheduled to be sent to the lead
Options are provided for:
- – terminate the lead registration, and cease all reach-outs for this particular campaign
- – Book an appointment for this lead, against this campaign
Clicking the Add Registration button will enable you to select one of your existing campaigns, and register the lead upon it.
Adding a new lead appointment
A lead appointment is created by clicking on the button alongside the relevant lead campaign. The new appointment popup will be displayed:
The lead name and campaign will be pre-filled. A list of forthcoming sessions will be displayed.
Select the session upon which you wish to book the lead, and click either Book Appointment or Add to Waitlist. As an employee, and as with regular sessions, you may opt to over-subscribe sessions at your discretion.
Campaign Appointments
The appointments section of the Summary tab displays all of the leads past and future booked appointments.
For each appointment, the following information is displayed:
- Session – the session upon which the lead is booked
- Campaign – the campaign from which the booking originated
- Appointment – the appointment/session date/time
- Booked – how long ago the appointment was booked
- Status – the booking status
For each appointment, options are provided for:
- – Cancel the appointment, and a cancel notification will be sent
- – Mark the lead as having attended the session
- – Mark the lead as being a “no-show”
Lead Notes
As with members and employees, you may record notes against a lead. These can be helpful to record additional interactions or conversations you might have had with the lead.
Lead Messages
As with members, leads have a Messages tab where all of their incoming and outgoing email and SMS communications are recorded.
Unread messages are displayed in bold. You may double-click on a message to read the content, and to reply accordingly.
Leads may be sent (non-automated) messages from either within their own Messages tab, or from the main message centre.
Reach-out Log
The Reach-out Log tab for a lead shows a list of all of the automated reach-out messages that have been sent to them.
For each reach-out you can see:
- Date/Time – When the reach-out was sent
- Type – The method by which the reach-out was sent
- Description – The name of the reach-out
- Campaign – The campaign to which the reach-out related
Archiving or Converting a Lead
To archive a lead, click the Archive button at the top of their details page. This will terminate all of their campaign registrations, as well as any forthcoming appointments that they have booked. The lead will be marked as “terminated”.
To convert a lead to a member, click the Convert button. A new member record will be created using the lead’s details, and you will be taken to it. The lead will be sent the “welcome” email. Any messages sent to/from the lead during the marketing process will be copied to their member record. The lead will be marked as “converted”.
Note: If a member exists with the same email and/or mobile as the lead, a warning will be displayed. In this circumstance, the lead will need to be migrated manually, as duplicate emails/mobiles cannot exist for members.


