It seems like the number of compliance checks required to be undertaken by gyms and fitness studios is forever growing. Different facilities manage these checks in different ways.
Quoox provides a flexible solution for staying on top of member compliance, without forcing a prescriptive process upon you that you may not wish.
The concept
As the facility owner/manager you may configure a pre-defined list of compliance/document checks that you wish to monitor against a member.
This list should ideally be limited to compliance/document matters, and the urge to use it as a broader task tracking process should be resisted. Quoox provides other (more suitable) tools for such purposes.
Compliance document statuses may be recorded against a member. The date of compliance and validating staff member is recorded. An optional expiry date may also be provided. For example, if a check expires after 1 year, you may set a 1 year expiry date.
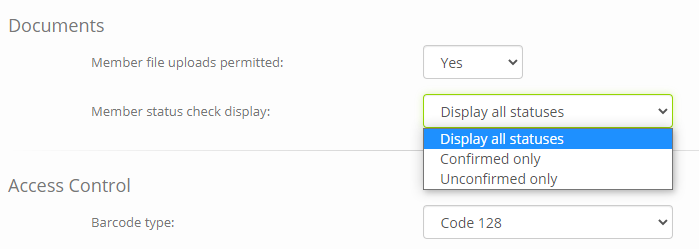
Status checks are displayed both against the member record and also within roll-call. You may determine if you wish all status checks to be displayed, or just those with/without compliance.
The initial setup
The initial setup is very simple, and comprised just two steps.
Define your compliance/document checks
From the main menu, select Settings then Lists and Groups. Find and edit the list called Member Status Checks.
Add the compliance checks that you wish to record to the list. For example, you might have:
- Liability Waiver
- PAR-Q Checked
- COVID-19 Declaration
Set your preferred display option
By default, Quoox will display the statuses for all checks/documents against a member and in roll-call.
From the main navigation menu, select Settings. Scroll down to the Documents section.
Make your selection from:
- Display all statuses – All checks (confirmed or unconfirmed) will be displayed against the member
- Confirmed only – Only those checks that have been confirmed will be displayed against the member
- Unconfirmed only – Only those checks that have not been confirmed will be displayed against the member
Adding or updating a member status check
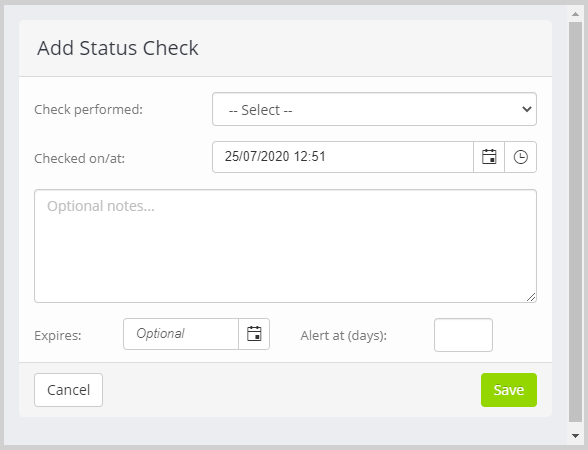
To add a new member status check, click the Add Check button alongside the existing member checks (under the reliability bar).
For each check you may provide:
- Check performed – Select from the list the check that was performed. These are configured via lists and groups as described above.
- Checked on/at – The date/time upon which the check was performed. This will default to the current date/time.
- Notes – Optionally add notes about a given check
- Expires – Optionally set an expiry date for the check.
- Alert at (days) – Optionally set an alert days number for the check.
Notes
- If you set an expiry date and the “alert at” field, the status will change to an orange warning that number of days prior to expiry.
- Adding a new check of a type that already exists will supersede the previous check, but the previous check will remain recorded in the audit trail.
- You can delete an existing check record by clicking on it and clicking the Delete button.
- You can edit an existing check record by clicking on it and amending the data.
Status check report
From within the Reporting > Reports option from the main navigation menu, a status check report is available. This is called Members > Status Check Summary.
You may optionally provide individual members or member groups into this report, to filter your results.


